Devs.tw 是讓工程師寫筆記、網誌的平台。歡迎您隨手紀錄、寫作,方便日後搜尋!
Devs.tw 是讓工程師寫筆記、網誌的平台。歡迎您隨手紀錄、寫作,方便日後搜尋!
5 行程式碼 架設網站

Youtube: Python Flask 入門指南 : 輕量級網頁框架教學 | 前端 x 後端 | 5 行程式碼 架設網站【Gamma Ray 軟體工作室】
Python Flask 是一種輕量級的網頁框架,只要五行程式碼,就可以架設網頁伺服器 :
$ pip install Flaskfrom flask import Flask
app = Flask(__name__)
@app.route("/")
def hello():
return "Hello, World!"$ flask run 出現「Running on http://127.0.0.1:5000/ (Press CTRL+C to quit)」的文字
瀏覽器訪問 127.0.0.1:5000,出現 Hello World ,代表架設完成 !

在 Flask 的官網,對於 「micro」 有這樣的定義 :
輕量並不代表缺少功能,而是在保持核心簡單的情況下,留有擴展空間。
做法就是不為你事先做出決定,只會包含「你需要的一切,而沒有你不需要的」。除了說明上述五行程式碼代表的含義,還會延伸幾項後端開發常見的配置:
從 Flask 入門網站開發,可以帶你快速的了解,網頁框架通常會具備的功能,以及累積網站開發後端的知識。
對於後續要了解 Python 在網路領域,相關的技術與應用,例如: 爬蟲的原理或者資料庫的數據分析,
都可以大幅提升學習的效率。
章節中的程式碼範例
Python 版本建議 3.4 以上,內置的 pip 工具可以節省很多時間
from flask import Flask
app = Flask(__name__)
@app.route("/")
def hello():
return "Hello, World!"第一行 : from flask import Flask
另外一種更常見的 import 方式,可以簡化第二行的建構式宣告。

方法一:
import Flask
app = flask.Flask(__name__)

方法二:
from flask import Flask
app = Flask(__name__)

方法二為官網的範例。
第二行 : app = Flask(__name__)
Flask 類別 初始化時 傳入的 __name__ 參數,代表當前模組的名稱。
是固定用法,以便讓 Flask 知道在哪裡尋找資源。
(例如: 模板和靜態文件)
第三行 : @app.route("/")
裝飾器是告訴 Flask,哪個 URL 應該觸發我們的函式。

斜線代表的就是網站的根目錄,可以疊加。

例如: 新增一個 /hello 的位址

@app.route("/")
@app.route("/hello")
def hello():
    return "Hello, World!"

網站訪問首頁與/hello,呈現的同樣是 hello 函式,回傳的 Hello World 文字。
def hello(): : 被觸發的函式 第四行return "Hello, World!" : 函式回傳的文字字串,也等於 Web API 回傳的內容。第五行flask run 指令
官方範例,檔名為 app.py 使用的是 flask run 指令,可以直接啟動網站。

在日常的開發中,可以再加上 python 的 main 方法,
執行 app.run() 函式,執行網頁伺服器的啟動動作。
調整後 : hello-world.py
# save this as app.py
import flask
app = flask.Flask(__name__)

@app.route("/")
@app.route("/hello")
def hello():
    return "Hello, World!"

if __name__ == '__main__':
app.run()除了固定的導向位址,URL 也可以成為函式接收的參數
routing.py
@app.route('/data/appInfo/<name>', methods=['GET'])
def queryDataMessageByName(name):
    print("type(name) : ", type(name))
    return 'String => {}'.format(name)
<name> 代表接收 name 參數為 字串型態
http://127.0.0.1:5000/data/appInfo/FlaskSEtype(name) : <class 'str'>String => FlaskSE@app.route('/data/appInfo/id/<int:id>', methods=['GET'])
def queryDataMessageById(id):
print("type(id) : ", type(id))
return 'int => {}'.format(id)http://127.0.0.1:5000/data/appInfo/id/5type(id) : <class 'int'>int => 5@app.route('/data/appInfo/version/<float:version>', methods=['GET'])
def queryDataMessageByVersion(version):
print("type(version) : ", type(version))
return 'float => {}'.format(version)http://127.0.0.1:5000/data/appInfo/version/1.01type(version) : <class 'float'>float => 1.01Python Flask 使用 Jinja2 的模板引擎
@app.route('/text')
def text():
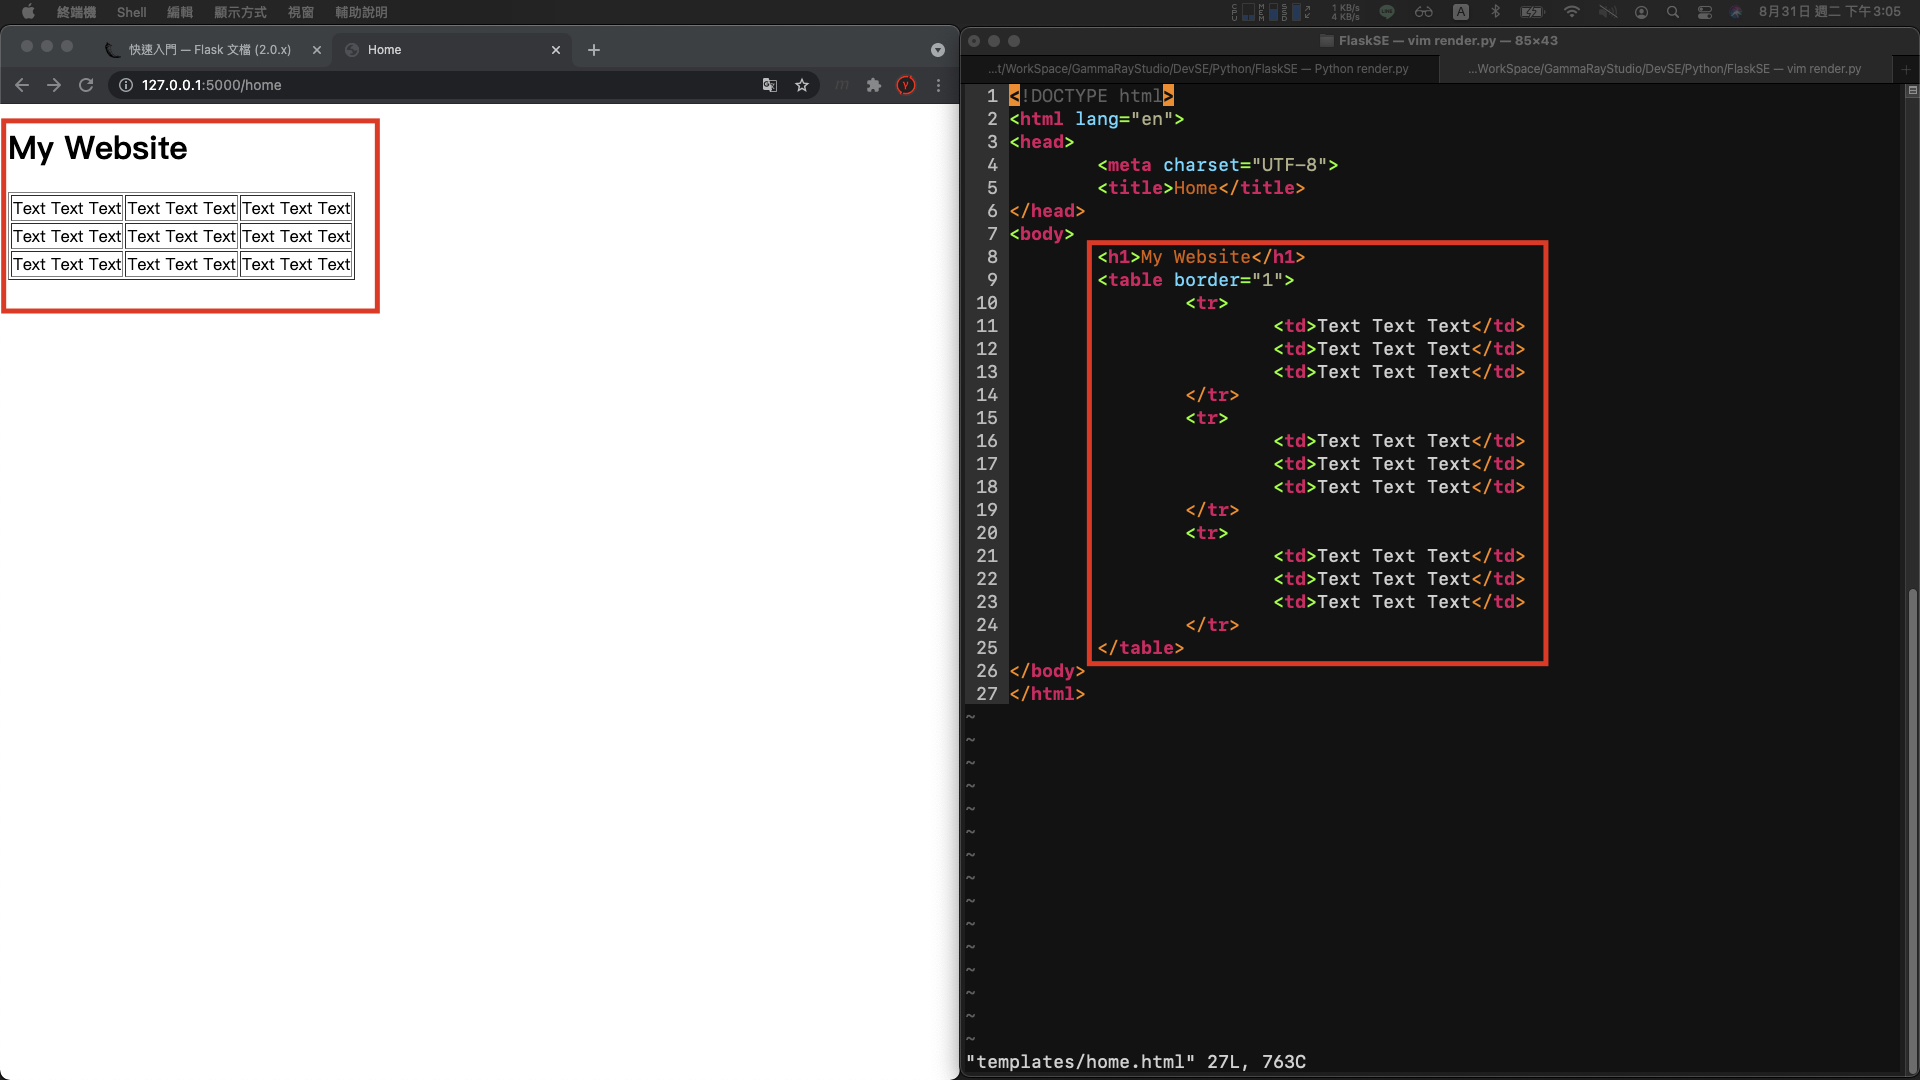
return '<html><body><h1>Hello World</h1></body></html>'Hello World 元素簡單的格式還可以,複雜一點,回傳 html 檔案會較為理想。在 python 執行檔的目錄下,創建 templates 資料夾,html 檔案放置於此
render.py
@app.route('/home')
def home():
    return render_template('home.html')
templates/home.html
<!DOCTYPE html>
<html lang="en">
<head>
        <meta charset="UTF-8">
        <title>Home</title>
</head>
<body>
        <h1>My Website Text</h1>
        <table border="1">
                <tr>
                        <td>Text Text Text</td>
                        <td>Text Text Text</td>
                        <td>Text Text Text</td>
                </tr>
                <tr>
                        <td>Text Text Text</td>
                        <td>Text Text Text</td>
                        <td>Text Text Text</td>
                </tr>
                <tr>
                        <td>Text Text Text</td>
                        <td>Text Text Text</td>
                        <td>Text Text Text</td>
                </tr>
        </table>
</body>
</html>http://127.0.0.1:5000/home
API 返回網頁時,可以做更多的事情
先看完整的程式碼,接續有說明。render.py
from flask import Flask, render_template
app = Flask(__name__)

@app.route('/text')
def text():
    return '<html><body><h1>Hello World</h1></body></html>'

@app.route('/home')
def home():
    return render_template('home.html')

@app.route('/page/text')
def pageText():
    return render_template('page.html', text="Python Flask !")

@app.route('/page/app')
def pageAppInfo():
    appInfo = {  # dict
        'id': 5,
        'name': 'Python - Flask',
        'version': '1.0.1',
        'author': 'Enoxs',
        'remark': 'Python - Web Framework'
    }
    return render_template('page.html', appInfo=appInfo)

@app.route('/page/data')
def pageData():
    data = {  # dict
        '01': 'Text Text Text',
        '02': 'Text Text Text',
        '03': 'Text Text Text',
        '04': 'Text Text Text',
        '05': 'Text Text Text'
    }
    return render_template('page.html', data=data)

@app.route('/static')
def staticPage():
    return render_template('static.html')

if __name__ == '__main__':
    app.run()
templates/page.html
<!DOCTYPE html>
<html lang="en">

<head>
    <meta charset="UTF-8">
    <meta http-equiv="X-UA-Compatible" content="IE=edge">
    <meta name="viewport" content="width=device-width, initial-scale=1.0">
    <title>Template - Page</title>
</head>

<body>
    <h1>Template - Page </h1>
    <h2>{{text}}</h2>

    {% if appInfo != undefined %}

    <h2>AppInfo : </h2>
    <p>id : {{appInfo.id}}</p>
    <p>name : {{appInfo.name}}</p>
    <p>version : {{appInfo.version}}</p>
    <p>author : {{appInfo.author}}</p>
    <p>remark : {{appInfo.remark}}</p>
    {% endif %}

    {% if data != undefined %}
    <h2>Data : </h2>
    <table border="1">
        {% for key, value in data.items() %}
        <tr>
            <th> {{ key }} </th>
            <td> {{ value }} </td>
        </tr>
        {% endfor %}
    </table>
    {% endif %}
</body>

</html>
API 附帶參數: @app.route('/page/text')
render.py
@app.route('/page/text')
def pageText():
return render_template('page.html', text="Python Flask !")templates/page.html
<h1>Template - Page </h1>
<h2>{{text}}</h2>{{ text }} 就可以將資料顯示在畫面上API 字典型態與頁面條件式 : @app.route('/page/app')
render.py
@app.route('/page/app')
def pageAppInfo():
    appInfo = {  # dict
        'id': 5,
        'name': 'Python - Flask',
        'version': '1.0.1',
        'author': 'Enoxs',
        'remark': 'Python - Web Framework'
    }
return render_template('page.html', appInfo=appInfo)@app.route('/page/app')render_template('page.html', appInfo=appInfo)templates/page.html
{% if appInfo != undefined %}
<h2>AppInfo : </h2>
<p>id : {{appInfo.id}}</p>
<p>name : {{appInfo.name}}</p>
<p>version : {{appInfo.version}}</p>
<p>author : {{appInfo.author}}</p>
<p>remark : {{appInfo.remark}}</p>
{% endif %}{% if boolean %}{% endif %}if appInfo != undefined : 如果 appInfo 有資料,html 標籤內容生效{{appInfo.object}} : 字典參數取用資料方法,同樣兩個大括號包覆後生效。API : 字典型態與頁面迴圈
render.py
@app.route('/page/data')
def pageData():
    data = {  # dict
        '01': 'Text Text Text',
        '02': 'Text Text Text',
        '03': 'Text Text Text',
        '04': 'Text Text Text',
        '05': 'Text Text Text'
    }
return render_template('page.html', data=data)@app.route('/page/data')return render_template('page.html', data=data)templates/page.html
{% if data != undefined %}
<h2>Data : </h2>
<table border="1">
    {% for key, value in data.items() %}
    <tr>
        <th> {{ key }} </th>
        <td> {{ value }} </td>
    </tr>
    {% endfor %}
</table>
{% endif %}{% if boolean %}{% endif %}{% for key, value in data.items() %}{{ key }} : 迴圈 key 值{{ value }} : 迴圈 value 值{% endfor %}在 python 執行檔的目錄下,創建 static 資料夾,.js 與 .css 檔案放置於此
前端開發的 javascript 與 css 檔案必須放在 static 資料夾才會生效。
static.py
@app.route('/static')
def staticPage():
    return render_template('static.html')
static/script.js
function sayHello(){
        alert("Hello World");
}
templates/static.html
<!DOCTYPE html>
<html lang="en">
<head>
        <meta charset="UTF-8">
        <title>Static - Page</title>
</head>
<body>
        <h1>Template - Page</h1>
        <button id="btnHello" onClick="sayHello()">Say Hello</button>
        <!-- <script src="../static/script.js"></script> -->
        <script type = "text/javascript"
         src = "{{ url_for('static', filename = 'script.js') }}" ></script>
</body>
</html>{{ url_for('static', filename = 'script.js') }}
結合路由註冊與網頁模版,完整實現前端與後端的資料交換
前端 : 示範兩種
後端 : JSON 格式
同樣先看代碼,接續代碼說明
form.py
from flask import Flask, request, render_template, redirect, url_for
app = Flask(__name__)

@app.route('/form')
def formPage():
    return render_template('Form.html')

@app.route('/submit', methods=['POST', 'GET'])
def submit():
    if request.method == 'POST':
        user = request.form['user']
        print("post : user => ", user)
        return redirect(url_for('success', name=user, action="post"))
    else:
        user = request.args.get('user')
        print("get : user => ", user)
        return redirect(url_for('success', name=user, action="get"))

@app.route('/success/<action>/<name>')
def success(name, action):
    return '{} : Welcome {} ~ !!!'.format(action, name)

if __name__ == '__main__':
    app.run()
templates/form.html
<!DOCTYPE html>
<html lang="en">
<head>
    <meta charset="UTF-8">
    <meta http-equiv="X-UA-Compatible" content="IE=edge">
    <meta name="viewport" content="width=device-width, initial-scale=1.0">
    <title>Form - Submit</title>
</head>
<body>
    <h2>POST</h2>
    <form action="/submit" method="post">
        <h2>Enter Name:</h2>
        <p><input type="text" name="user" /></p>
        <p><input type="submit" value="submit" /></p>
    </form>
    <h2>GET</h2>
    <form action="/submit" method="get">
        <h2>Enter Name:</h2>
        <p><input type="text" name="user" /></p>
        <p><input type="submit" value="submit" /></p>
    </form>
</body>
</html>
前端 : Form 表單提交
templates/form.html
<form action="/submit" method="post">
    <h2>Enter Name:</h2>
    <p><input type="text" name="user" /></p>
    <p><input type="submit" value="submit" /></p>
</form>
<h2>GET</h2>
<form action="/submit" method="get">
    <h2>Enter Name:</h2>
    <p><input type="text" name="user" /></p>
    <p><input type="submit" value="submit" /></p>
</form>
<form></form> : 兩個 form 表單元素action : 提交目標,也就是路由的 URLmethod : http 常見的提交方法,這裡分別實作 get 與 post 方法<input type="text" name="user" /> : 傳遞表單參數 name<input type="submit" value="submit" /> : html 元素,form 提交按鈕後端 : 網頁模版與資料接口
form.py
@app.route('/form')
def formPage():
return render_template('Form.html')from flask import ... , request, redirect, url_for
@app.route('/submit', methods=['POST', 'GET'])
def submit():
if request.method == 'POST':
user = request.form['user']
print("post : user => ", user)
return redirect(url_for('success', name=user, action="post"))
else:
user = request.args.get('user')
print("get : user => ", user)
return redirect(url_for('success', name=user, action="get"))@app.route('/submit', methods=['POST', 'GET'])
@app.route('/submit', ... ) : 註冊路由為 /submit@app.route( ... , methods=['POST', 'GET']): 接收 POST 與 GET 方法request : import 導入,物件的 method 成員,可以知道前端傳遞的是使用 HTTP 的哪種方法if request.method == 'POST': : POST 方法必須使用 request.form 的變數else: : GET 方法必須使用 request.args 的變數return redirect(url_for('success', name=user, action="post"))
@app.route('/success/<action>/<name>')
def success(name, action):
return '{} : Welcome {} ~ !!!'.format(action, name)完整 form 表單提交 與 接收成功後轉址流程

同樣先看代碼,接續代碼說明
文件結構
ajax.py
from flask import Flask, render_template, request, jsonify, json
app = Flask(__name__)

@app.route('/data')
def webapi():
    return render_template('data.html')

@app.route('/data/message', methods=['GET'])
def getDataMessage():
    if request.method == "GET":
        with open('static/data/message.json', 'r') as f:
            data = json.load(f)
            print("text : ", data)
        f.close
        return jsonify(data)  # 直接回傳 data 也可以,都是 json 格式

@app.route('/data/message', methods=['POST'])
def setDataMessage():
    if request.method == "POST":
        data = {
            'appInfo': {
                'id': request.form['app_id'],
                'name': request.form['app_name'],
                'version': request.form['app_version'],
                'author': request.form['app_author'],
                'remark': request.form['app_remark']
            }
        }
        print(type(data))
        with open('static/data/input.json', 'w') as f:
            json.dump(data, f)
        f.close
        return jsonify(result='OK')

if __name__ == '__main__':
    app.run()
data.html
<!DOCTYPE html>
<html lang="en">
<head>
    <meta charset="UTF-8">
    <meta http-equiv="X-UA-Compatible" content="IE=edge">
    <meta name="viewport" content="width=device-width, initial-scale=1.0">
    <script src="../static/jquery-3.6.0.min.js"></script>
    <title>WebAPI</title>
</head>
<body>
    <h1>DATA : API</h1>
    <h2>API : GET</h2>
    <button id='btnGet'>GET</button>
    <hr>
    <h2>API : POST</h2>
    <p>APP_ID :
        <input id="app_id" name="app_id" type="number" />
    </p>
    <p>APP_NAME :
        <input id="app_name" name="app_name" type="text" />
    </p>
    <p>APP_VERSION :
        <input id="app_version" name="app_version" type="text" />
    </p>
    <p>APP_AUTHOR :
        <input id="app_author" name="app_author" type="text" />
    <p>APP_REMARK :
        <input id="app_remark" name="app_remark" type="text" />
    </p>
    <button id="btnPost">POST</button>
    <hr>
    <h3>Console : </h3>
    <div id="console"></div>
    <script>
        $(function () {
            var $btnGet = $('#btnGet');
            var $console = $('#console');
            var $btnPost = $('#btnPost');
            var $edtAppId = $('#app_id');
            var $edtAppName = $('#app_name');
            var $edtAppVersion = $('#app_version');
            var $edtAppAuthor = $('#app_author');
            var $edtAppRemark = $('#app_remark');
            $btnGet.off('click').on('click', function () {
                $.ajax({
                    url: '/data/message',
                    data: {},
                    type: 'GET',
                    success: function (data) {
                        $console.text("");
                        $console.append("data[id] : " + data.appInfo.id + "---");
                        $console.append("data[name] : " + data.appInfo.name + "---");
                        $console.append("data[version] : " + data.appInfo.version + "---");
                        $console.append("data[author] : " + data.appInfo.author + "---");
                        $console.append("data[remark] : " + data.appInfo.remark + "---");

                        $edtAppId.val(data.appInfo.id);
                        $edtAppName.val(data.appInfo.name);
                        $edtAppVersion.val(data.appInfo.version);
                        $edtAppAuthor.val(data.appInfo.author);
                        $edtAppRemark.val(data.appInfo.remark);

                    },
                    error: function (xhr) {
                        alert('Ajax request 發生錯誤');
                    }
                });
            })
            $btnPost.off('click').on('click',function(){
                $.ajax({
                    url: '/data/message',
                    data: {
                        "app_id" : $edtAppId.val() ,
                        "app_name" : $edtAppName.val(),
                        "app_version" : $edtAppVersion.val(),
                        "app_author" : $edtAppAuthor.val(),
                        "app_remark" : $edtAppRemark.val(),

                    },
                    type: 'POST',
                    success: function (data) {
                        $console.text("result = ");
                        $console.append(data.result);
                    },
                    error: function (xhr) {
                        alert('Ajax request 發生錯誤');
                    }
                });
            });
        });
    </script>
</body>
</html>
/static/jquery-3.6.0.min.js
jQuery 函式庫,Ajax() 函式會使用到/data/input.json
空白內容,用於寫入資料的目標檔案/data/message.json
{
    "appInfo" : {
        "id" : 5,
        "name" : "Python - Flask" ,
        "version" : "1.0.1" ,
        "author" : "author" ,
        "remark" : "Python - Web Framework"
    }
}後端 : 網頁模版與資料接口
ajax.py
@app.route('/data')
def webapi():
return render_template('data.html')@app.route('/data/message', methods=['GET'])
def getDataMessage():
if request.method == "GET":
with open('static/data/message.json', 'r') as f:
data = json.load(f)
print("text : ", data)
f.close
return jsonify(data) # 直接回傳 data 也可以,都是 json 格式@app.route('/data/message', methods=['GET']) : 註冊路由為 data/message,接收 Get 方法with open('static/data/message.json', 'r') as f: : 讀取靜態文件 data 資料夾下的 message.json 檔案
data = json.load(f) : 使用 json 物件,讀取 message.json 檔案內的 json 文字格式。f.close : 讀取完成後,關閉文件。return jsonify(data) : data 為 JSON 格式的字串,可以直接回傳,可以使用 jsonify() 函式,序列化後再進行傳遞。@app.route('/data/message', methods=['POST'])
def setDataMessage():
if request.method == "POST":
data = {
'appInfo': {
'id': request.form['app_id'],
'name': request.form['app_name'],
'version': request.form['app_version'],
'author': request.form['app_author'],
'remark': request.form['app_remark']
}
}
print(type(data))
with open('static/data/input.json', 'w') as f:
json.dump(data, f)
f.close
return jsonify(result='OK')@app.route('/data/message', methods=['POST']) : 註冊路由為 data/message,接收 Get 方法data = { ... } : 從 request 取得前端的提交的表單內容,儲存在字典型態的變數中with open('static/data/input.json', 'w') as f: : 寫入靜態文件 data 資料夾下的 input.json 檔案
json.dump(data, f) : 使用 json 物件,寫入 json 文字格式到 input.json 檔案。f.close : 讀取完成後,關閉文件。return jsonify(result='OK') : 使用 jsonify() 函式,序列化 JSON 格式的字串,回傳 resulut = OK 的內容前端 : jQuery 按鈕,Ajax 請求 Get 與 Post
<!DOCTYPE html>
<html lang="en">
<head>
    ...
    <script src="../static/jquery-3.6.0.min.js"></script>
    ...
</head>
<body>
...
</body>
</html>
<h1>DATA : API</h1>
<h2>API : GET</h2>
<button id='btnGet'>GET</button>
<hr>
<h2>API : POST</h2>
<p>APP_ID :
    <input id="app_id" name="app_id" type="number" />
</p>
<p>APP_NAME :
    <input id="app_name" name="app_name" type="text" />
</p>
<p>APP_VERSION :
    <input id="app_version" name="app_version" type="text" />
</p>
<p>APP_AUTHOR :
    <input id="app_author" name="app_author" type="text" />
<p>APP_REMARK :
    <input id="app_remark" name="app_remark" type="text" />
</p>
<button id="btnPost">POST</button>
<hr>
<h3>Console : </h3>
<div id="console"></div>
<button id='btnGet'>GET</button> : GET 按鈕,用來觸發 Ajax 訪問取得資料的 API<button id="btnPost">POST</button> : POST 按鈕,用來將五項輸入框的文字,透過 Ajax 傳遞給 API
<input id="app_id" name="app_id" type="number" /><input id="app_name" name="app_name" type="text" /><input id="app_version" name="app_version" type="text" /><input id="app_author" name="app_author" type="text" /><input id="app_remark" name="app_remark" type="text" /><div id="console"></div> : Console 文字區塊,用來打印 Ajax 接收的資料內容var $btnGet = $('#btnGet');
var $console = $('#console');
var $btnPost = $('#btnPost');
var $edtAppId = $('#app_id');
var $edtAppName = $('#app_name');
var $edtAppVersion = $('#app_version');
var $edtAppAuthor = $('#app_author');
var $edtAppRemark = $('#app_remark');$btnGet.off('click').on('click', function () {
$.ajax({
url: '/data/message',
data: {},
type: 'GET',
success: function (data) {
$console.text("");
$console.append("data[id] : " + data.appInfo.id + "---");
$console.append("data[name] : " + data.appInfo.name + "---");
$console.append("data[version] : " + data.appInfo.version + "---");
$console.append("data[author] : " + data.appInfo.author + "---");
$console.append("data[remark] : " + data.appInfo.remark + "---");
$edtAppId.val(data.appInfo.id);
$edtAppName.val(data.appInfo.name);
$edtAppVersion.val(data.appInfo.version);
$edtAppAuthor.val(data.appInfo.author);
$edtAppRemark.val(data.appInfo.remark);
},
error: function (xhr) {
alert('Ajax request 發生錯誤');
}
});
})$btnGet.off('click').on('click', function () {}) : GET 按鈕點擊事件$.ajax({}) : 使用 jQuery 的 Ajax 函式
url: '/data/message' : 訪問路徑為 /data/meesagedata: {} : 不傳遞資料type : 'GET' : 使用 GET 方法success: function (data) {} : 成功的話,觸發函式動作
$console.text(""); + $console.append("...") : 將資料打印在 Console 元件上$edtAppXXX.val(...); : 將數值內容填入到,畫面上的五個輸入框。error: function (xhr) {} : 失敗的話,觸發函式動作
alert('Ajax request 發生錯誤'); : 顯示對話視窗,Ajax request 發生錯誤$btnPost.off('click').on('click',function(){
$.ajax({
url: '/data/message',
data: {
"app_id" : $edtAppId.val() ,
"app_name" : $edtAppName.val(),
"app_version" : $edtAppVersion.val(),
"app_author" : $edtAppAuthor.val(),
"app_remark" : $edtAppRemark.val(),
},
type: 'POST',
success: function (data) {
$console.text("result = ");
$console.append(data.result);
},
error: function (xhr) {
alert('Ajax request 發生錯誤');
}
});
});$btnPost.off('click').on('click',function(){}) : POST 按鈕點擊事件$.ajax({}) : 使用 jQuery 的 Ajax 函式
url: '/data/message' : 訪問路徑為 /data/meesagedata: { ... } : 傳遞五個輸入框的文字內容
"app_id" : $edtAppId.val()"app_name" : $edtAppName.val()"app_version" : $edtAppVersion.val()"app_author" : $edtAppAuthor.val()"app_remark" : $edtAppRemark.val()type : 'POST' : 使用 POST 方法success: function (data) {} : 成功的話,觸發函式動作
$console.text("result = "); + $console.append("...") : 將資料打印在 Console 元件上error: function (xhr) {} : 失敗的話,觸發函式動作
alert('Ajax request 發生錯誤'); : 顯示對話視窗,Ajax request 發生錯誤get 按鈕,點擊後資料傳輸流程

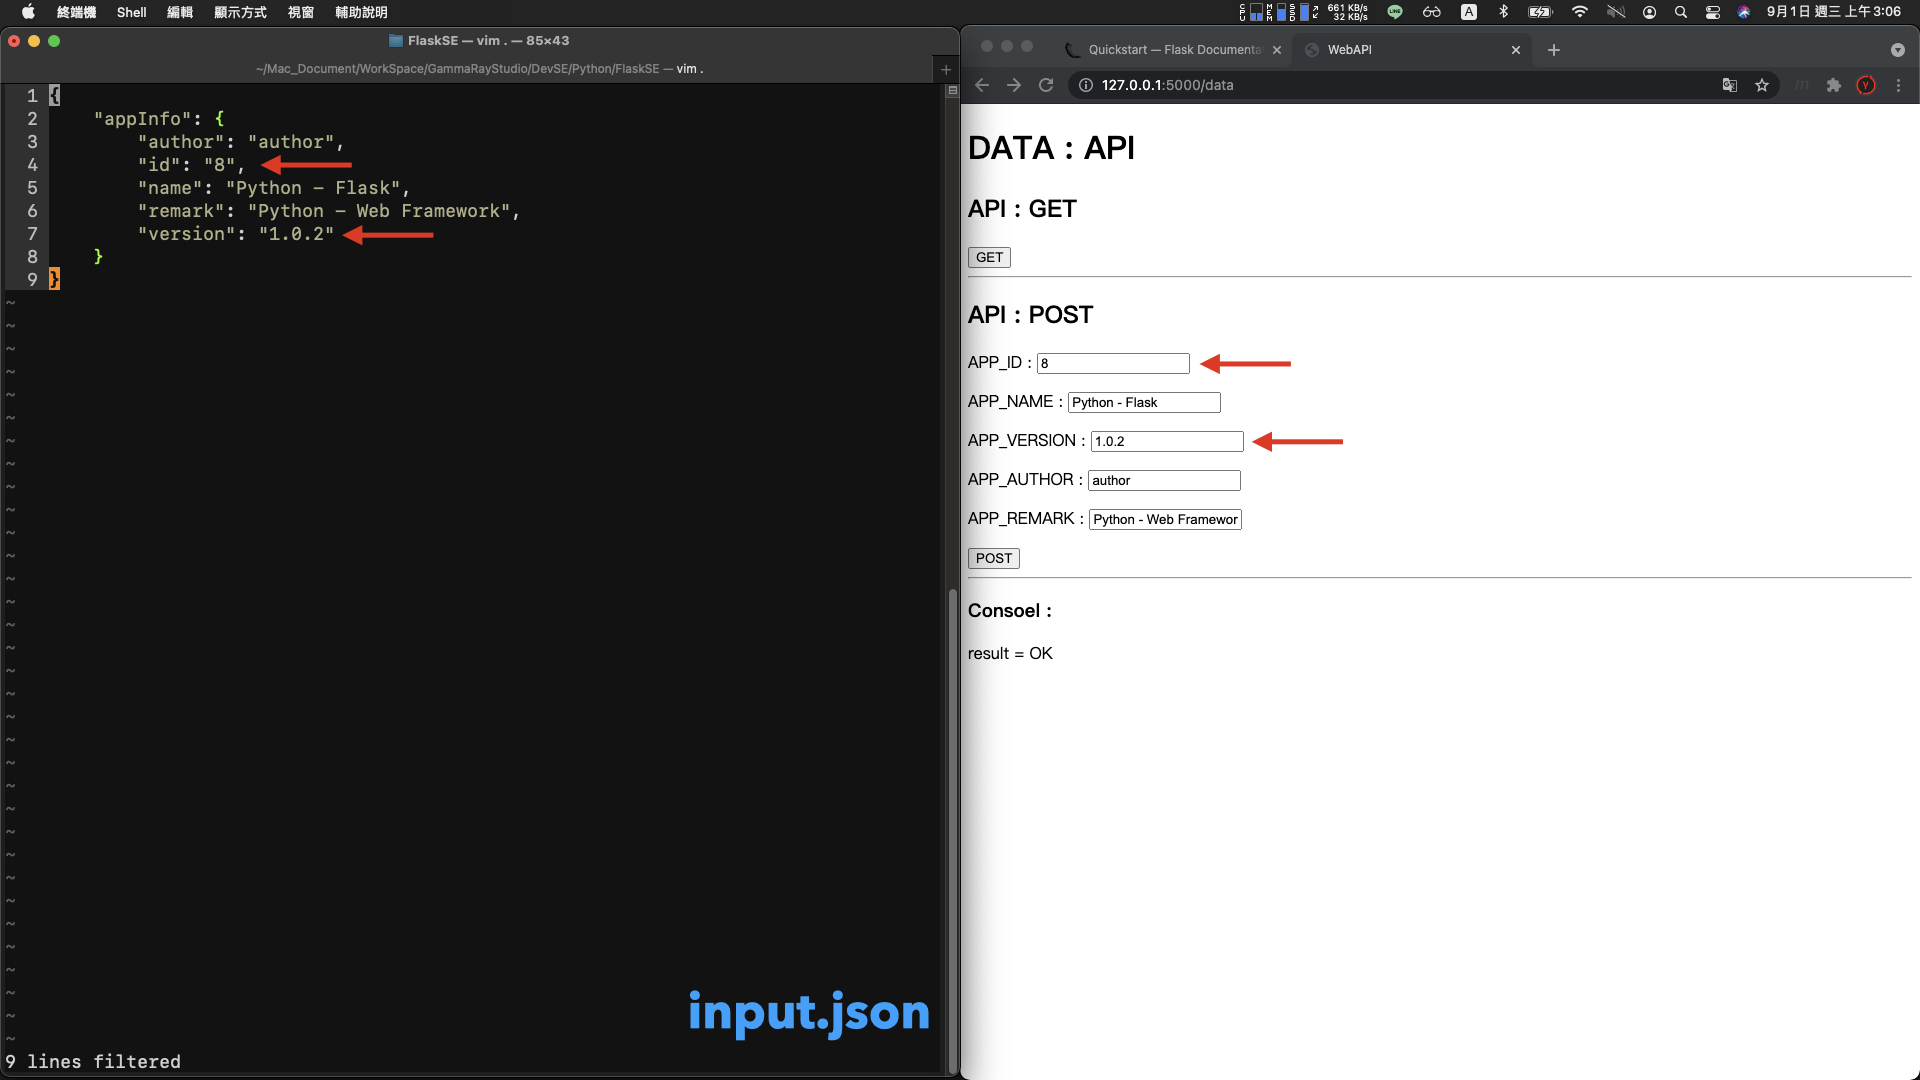
post 按鈕,點擊後資料傳輸流程

寫入的 input.json 資料內容與輸入框文字相同

補充兩個開發時,應該要知道的配置
先前的程式碼,如果試著使用,除 127.0.0.1 或 localhost 以外的網址,
例如: 區域網路 192.168.2.12,瀏覽器會顯示「無法連上這個網站」

Flask 預設配置 是不允許外部的訪問
增加配置
if __name__ == '__main__':
    app.run('0.0.0.0')
在 main 方法的 app.run() 函式中,加上 0.0.0.0 的字串。
配置到產品的伺服器中,客戶端的電腦才能夠連接上網站的伺服器。
先前的程式碼中,任何的修改都必須要重新啟動。(網頁的程式碼也是如此)
增加配置
if __name__ == '__main__':
    app.run('0.0.0.0', debug=True)
在 main 方法的 app.run() 函式中,加上 debug = True 開啟 Debug 模式。
程式碼的任何修改,儲存後就會立刻生效,省去許多伺服器重新啟動的時間。

dev-config.py
import flask
app = flask.Flask(__name__)

@app.route("/")
@app.route("/hello")
def hello():
    return "Hello, World ~ !!! Text Text Text ~ !!!"

if __name__ == '__main__':
app.run('0.0.0.0', debug=True)第三章節 Ajax 資料交換,後端 Python 的實作是使用讀寫 json 的檔案,來模擬資料持久化的部分。
不過真實的後端開發,都應該會使用關聯式的資料庫,例如 : MySQL、MS-SQL 來進行數據的保存。
這部分,不在 flask 的套件裡面,必須安裝 flask_sqlalchemy 與相對應的 python sql 套件,才能夠進行實作。

後續會獨立說明。
https://flask.palletsprojects.com/en/2.0.x/
還有進階版嗎?